Simple Chat Using WebSocket and PHP Socket
The WebSocket is a feature of HTML5 for establishing a socket connections between a web browser and a server, once the connection has been established with the server, all WebSocket data (frames) are sent directly over a socket rather than usual HTTP response and requests, giving us much faster and persistent communication between a web browser and a server. Let’s create a simple chat system using this cool technology (HTML5 WebSocket and PHP).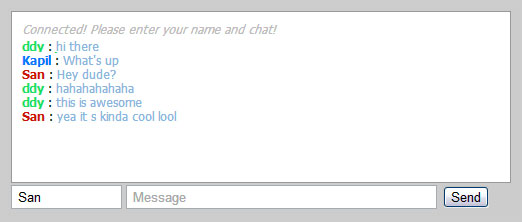
Browser Support
Old browsers do not support WebSockets, you need latest browser that supports HTML5 WebSocket features, Please see caniuse.com to find-out all WebSocket supported browsers.Getting Started with WebSocket
Client side WebSocket implementation is very easy, the entire code consist of few methods and events. Have a look at code below for example.JS
12345678
//create a new WebSocket object.
websocket = new WebSocket("ws://localhost:9000/daemon.php");
websocket.onopen = function(evt) { /* do stuff */ }; //on open event
websocket.onclose = function(evt) { /* do stuff */ }; //on close event
websocket.onmessage = function(evt) { /* do stuff */ }; //on message event
websocket.onerror = function(evt) { /* do stuff */ }; //on error event
websocket.send(message); //send method
websocket.close(); //close method- WebSocket(wsUri) — creates a new WebSocket object.
- .onopen — Event occurs when connection is established.
- .onclose — Event occurs when connection is closed.
- .onmessage — Event occurs when client receives data from server.
- .onerror — Event occurs when there is an error.
- .send(message) — Transmits data to server using open connection.
- .close() — Terminates existing connection.
JQUERY
12345678910111213141516171819202122232425262728293031
$(document).ready(function(){
	//Open a WebSocket connection.
	var wsUri = "ws://localhost:9000/daemon.php";
	websocket = new WebSocket(wsUri);

    //Connected to server
	websocket.onopen = function(ev) {
		alert('Connected to server ');
	}

    //Connection close
	websocket.onclose = function(ev) {
    	alert('Disconnected');
    };

    //Message Receved
	websocket.onmessage = function(ev) {
    	alert('Message '+ev.data);
    };

    //Error
	websocket.onerror = function(ev) {
    	alert('Error '+ev.data);
    };

     //Send a Message
	$('#send').click(function(){
		var mymessage = 'This is a test message';
        websocket.send(mymessage);
	});
});
Chat Page
As explained in examples above, we start by creating a WebSocket object, attaching event handlers and then using websocket.send() method to send the data. Since we are sending a collection of chat values, such as user name, message, color etc, we’ll convert our data to JSON format before sending to server.JQUERY
12345678910111213141516171819202122232425262728293031323334353637383940414243444546474849505152535455
$(document).ready(function(){
	//create a new WebSocket object.
	var wsUri = "ws://localhost:9000/daemon.php";
	websocket = new WebSocket(wsUri);

	websocket.onopen = function(ev) { // connection is open
		$('#message_box').append("<div class=\"system_msg\">Connected!</div>"); //notify user
	}

	$('#send-btn').click(function(){ //use clicks message send button
		var mymessage = $('#message').val(); //get message text
		var myname = $('#name').val(); //get user name

		if(myname == ""){ //empty name?
			alert("Enter your Name please!");
			return;
		}
		if(mymessage == ""){ //emtpy message?
			alert("Enter Some message Please!");
			return;
		}

		//prepare json data
		var msg = {
		message: mymessage,
		name: myname,
		color : '<?php echo $colours[$user_colour]; ?>'
		};
		//convert and send data to server
		websocket.send(JSON.stringify(msg));
	});

	//#### Message received from server?
	websocket.onmessage = function(ev) {
		var msg = JSON.parse(ev.data); //PHP sends Json data
		var type = msg.type; //message type
		var umsg = msg.message; //message text
		var uname = msg.name; //user name
		var ucolor = msg.color; //color

		if(type == 'usermsg')
		{
			$('#message_box').append("<div><span class=\"user_name\" style=\"color:#"+ucolor+"\">"+uname+"</span> : <span class=\"user_message\">"+umsg+"</span></div>");
		}
		if(type == 'system')
		{
			$('#message_box').append("<div class=\"system_msg\">"+umsg+"</div>");
		}

		$('#message').val(''); //reset text
	};

	websocket.onerror	= function(ev){$('#message_box').append("<div class=\"system_error\">Error Occurred - "+ev.data+"</div>");};
	websocket.onclose 	= function(ev){$('#message_box').append("<div class=\"system_msg\">Connection Closed</div>");};
});HTML
12345678
<div class="chat_wrapper">
<div class="message_box" id="message_box"></div>
<div class="panel">
<input type="text" name="name" id="name" placeholder="Your Name" maxlength="10" style="width:20%"  />
<input type="text" name="message" id="message" placeholder="Message" maxlength="80" style="width:60%" />
<button id="send-btn">Send</button>
</div>
</div>
Chat Server using PHP Socket
Ok! Now we have our chat page ready to connect to server, but we also need to create a WebSocket server that runs permanently (no time-outs), performs WebSocket handshaking, send/receive data from chat page and handles multiple clients, for that we will create a daemon script in PHP. Everyone knows PHP is mostly used to create dynamic webpages, but most of us didn’t know that we can also create daemons (that run in the background) using nothing but PHP. Install WebSocket Server Install a local web server such as WAMP or XAMPP. I am using XAMPP server on Win-XP, it lets me use shell option to start my daemon script. I am not sure if WAMP has the same feature, but you can follow Dani’s solution here to run this server script. If you want to implement it on your website, first check whether your host allows you to run daemon scripts and shell commands.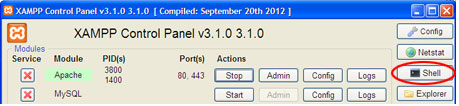 PHP Socket Steps
We will be using PHP socket to create our WebSocket Chat server, Basically our PHP Chat server should do the following.
PHP Socket Steps
We will be using PHP socket to create our WebSocket Chat server, Basically our PHP Chat server should do the following.
- Open a socket.
- Bind to a address.
- Listen incoming connections.
- Accept connections.
- WebSocket Handshake.
- Unmask/Encode data frames.
PHP
12
//Create TCP/IP sream socket and return the socket resource
$socket = socket_create(AF_INET, SOCK_STREAM, SOL_TCP);PHP
12
// Bind the source address
socket_bind($socket, 'localhost');PHP
12
// Listen to incoming connection
socket_listen($socket);PHP
12
// Accept new connections
socket_accept($socket);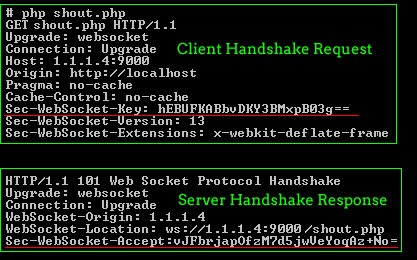 Handshake response with PHP :
PHP
123456789
$secKey = $headers['Sec-WebSocket-Key'];
$secAccept = base64_encode(pack('H*', sha1($secKey . '258EAFA5-E914-47DA-95CA-C5AB0DC85B11')));
$upgrade  = "HTTP/1.1 101 Web Socket Protocol Handshake\r\n" .
"Upgrade: websocket\r\n" .
"Connection: Upgrade\r\n" .
"WebSocket-Origin: $host\r\n" .
"WebSocket-Location: ws://$host:$port/deamon.php\r\n".
"Sec-WebSocket-Accept:$secAccept\r\n\r\n";
socket_write($client_conn,$upgrade,strlen($upgrade));Starting Chat Server
It’s time to download the sample files by clicking download button below, you should find 2 PHP files, index.php and server.php. Using your Shell command-line interface in XAMPP, start WebSocket chat server by typing :php -q c:\path-to-server\server.php
Once the server starts, you can navigate to index.php page using your browser and start test chatting.
Download